Sourdough baking represents one of humanity's oldest culinary traditions, a craft that transforms simple flour and water into complex, flavorful bread through the magic of wild fermentation. Unlike commercial yeast breads, sourdough develops its character through time, patience, and the cultivation of natural microorganisms. Mastering this art requires understanding the science behind fermentation, developing intuition for dough handling, and embracing the beautiful unpredictability of living cultures.
The Science of Sourdough
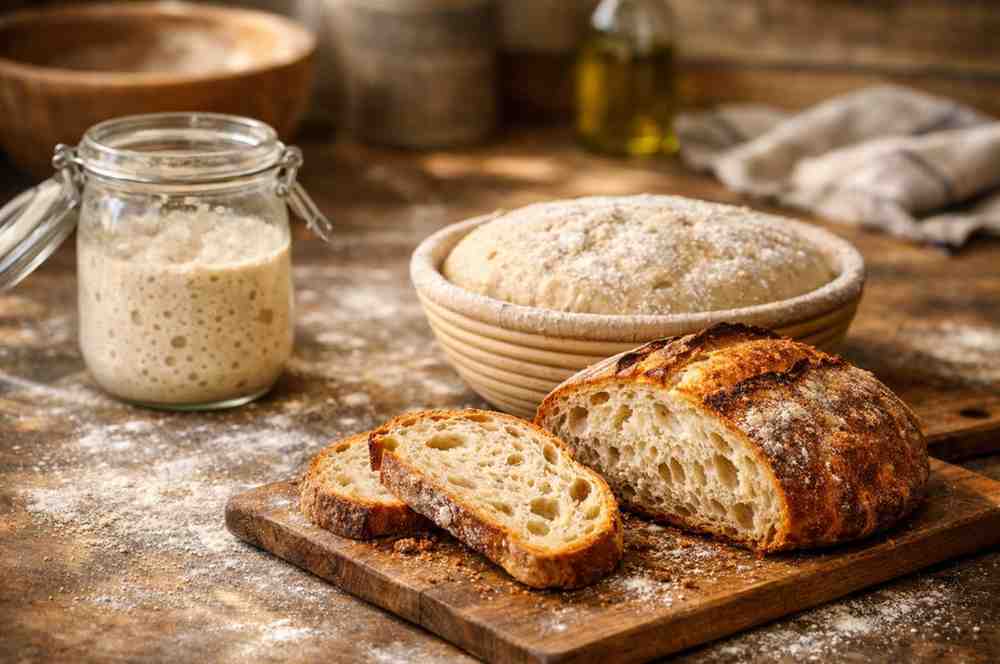
Sourdough begins with a starter—a living culture of wild yeasts and beneficial bacteria that naturally occur in flour and the environment. These microorganisms work together to ferment the dough, creating the characteristic tangy flavor, open crumb structure, and crisp crust that define exceptional sourdough bread. The process is both science and art: understanding the biological processes while developing the sensory skills to read dough texture, temperature, and fermentation activity.
The wild yeasts in sourdough produce carbon dioxide, which creates the bread's rise, while lactic acid bacteria produce organic acids that contribute to flavor and improve digestibility. This symbiotic relationship develops over time, with each feeding strengthening the culture and developing its unique flavor profile. Unlike commercial yeast, which provides quick, predictable results, sourdough requires patience and attention to detail.
Creating Your Starter
Initial Setup
Begin with equal parts flour and water by weight. Use unbleached, organic flour if possible—whole grain flours contain more wild yeasts and bacteria. Mix 100 grams of flour with 100 grams of filtered water in a clean glass jar. Cover loosely and let it sit at room temperature. Within 24-48 hours, you should see bubbles forming, indicating that fermentation has begun.
Daily Feedings
For the first week, feed your starter daily: discard half, then add 50 grams each of flour and water. This process removes waste products while providing fresh food for the microorganisms. You'll notice the starter becoming more active, with larger bubbles and a pleasant, slightly tangy aroma. The timing of feedings matters—feed when the starter has peaked and begun to fall, typically 4-8 hours after the previous feeding.
Recognizing Readiness
A mature starter will double in volume within 4-6 hours of feeding, have a domed surface, and smell pleasantly tangy without being overly acidic. It should pass the float test: a small spoonful dropped into water should float, indicating sufficient gas production. This typically takes 7-14 days, though environmental factors like temperature and humidity affect the timeline.
Maintaining Your Starter
Once established, your starter becomes a living heirloom that can last indefinitely with proper care. Many bakers maintain their starters for decades, passing them through generations. Regular feedings keep the culture active and healthy. If baking weekly, keep your starter at room temperature with daily feedings. For less frequent baking, store it in the refrigerator and feed weekly, bringing it to room temperature and feeding 2-3 times before baking.
Signs of a healthy starter include consistent rising, pleasant aroma, and active bubbles. If your starter develops an off smell, unusual colors, or fails to rise, it may need attention. Often, a few extra feedings with fresh flour and water will restore it. Remember that starters are resilient—they've survived for thousands of years because they're remarkably adaptable.
Mastering the Dough
Autolyse: The Foundation
Begin your dough with an autolyse—mixing flour and water and letting it rest for 30-60 minutes before adding salt and starter. This rest period allows the flour to fully hydrate, gluten to begin developing naturally, and enzymes to start breaking down starches. The result is a more extensible dough that's easier to work with and produces better texture in the final bread.
Mixing and Folding
Add your starter and salt, then mix until well combined. Sourdough benefits from gentle handling—rather than aggressive kneading, use a series of folds during the first few hours of bulk fermentation. Every 30-60 minutes, perform a fold: gently stretch the dough and fold it over itself. This builds strength without overworking the gluten, preserving the delicate gas bubbles that create the open crumb structure.
Bulk Fermentation
Bulk fermentation is where flavor develops. The dough should rise by 20-50%, depending on your recipe and desired flavor profile. Warmer temperatures (75-80°F) produce faster fermentation with milder flavor, while cooler temperatures (65-70°F) create slower, more complex development. Watch for signs of readiness: the dough should feel airy, show visible bubbles, and have a slightly domed surface.
Shaping and Final Proof
Shaping requires practice and a light touch. The goal is to create surface tension without deflating the dough. Use a bench scraper to gently shape the dough into a round or oval, creating a smooth outer surface. This outer "skin" will become your crust. Place the shaped dough seam-side up in a proofing basket or bowl lined with a floured cloth.
The final proof can happen at room temperature for 1-3 hours or in the refrigerator for 8-24 hours. Cold proofing, also called retarding, develops more complex flavors and makes the dough easier to score. The dough is ready when it feels light and airy, springs back slowly when gently pressed, and shows signs of fermentation activity.
Baking Techniques
Steam and Temperature
Proper sourdough baking requires steam during the initial phase to allow maximum oven spring—the rapid expansion that occurs in the first minutes of baking. Professional bakers use steam injection ovens, but home bakers can achieve excellent results using Dutch ovens, steam pans, or ice cubes. Bake at high temperature (450-500°F) for the first 20 minutes with steam, then reduce to 425-450°F for the remainder.
Scoring
Scoring—cutting the dough's surface before baking—serves both aesthetic and functional purposes. It controls where the bread expands, preventing random tearing and creating beautiful patterns. Use a sharp blade or razor, and make confident, decisive cuts at a 30-45 degree angle. Common patterns include a single slash, cross, or decorative designs. The depth depends on your desired expansion and aesthetic.
Determining Doneness
Perfect sourdough has a deeply golden, crisp crust that sounds hollow when tapped. The internal temperature should reach 200-210°F. The crumb should be open and airy with irregular holes, not dense or gummy. Color and texture matter: a well-baked loaf has caramelization on the crust and a springy, slightly moist interior.
Troubleshooting Common Issues
Dense crumb often results from under-fermentation, insufficient gluten development, or over-handling. Ensure adequate bulk fermentation time and proper folding technique. A flat loaf may indicate weak starter, over-proofing, or insufficient surface tension during shaping. Adjust your timing and technique accordingly.
Overly sour flavor comes from extended fermentation or an overly acidic starter. Use a younger starter, reduce fermentation time, or increase feeding frequency. Gummy texture suggests under-baking or cutting the bread too soon—always let sourdough cool completely before slicing, ideally for 2-4 hours.
Advanced Techniques
As you gain experience, experiment with different flours, hydration levels, and fermentation schedules. High-hydration doughs (75-85% water) create more open crumbs but require more skill to handle. Whole grain flours add nutrition and flavor but affect fermentation and texture. Long, cold ferments develop deeper flavors but require careful timing.
Consider maintaining multiple starters with different characteristics, or creating specialty loaves with additions like seeds, nuts, or dried fruits. Each variation teaches you something new about how flour, water, time, and temperature interact to create bread.
Conclusion: The Journey of Mastery
Mastering sourdough is a journey without a final destination. Each loaf teaches you something new about fermentation, timing, and the beautiful complexity of natural processes. Embrace failures as learning opportunities—even experienced bakers produce imperfect loaves. What matters is developing your intuition, understanding the science, and finding joy in the process.
Your starter becomes a living connection to generations of bakers who came before, each maintaining their own unique culture. As you feed it, shape dough, and pull golden loaves from your oven, you're participating in an ancient tradition that transforms simple ingredients into something extraordinary. Start where you are, be patient with the process, and let each bake teach you something new about this timeless craft.